While installing a WordPress Blog into your FASTDOT hosting account can be simply done by using Fantastico Deluxe, there are some occasions where you want to manually transferring your WordPress site blog to your FASTDOT hosting account. This may be because you already have a WordPress Blog hosted elsewhere and are changing hosting providers or you have a WordPress Blog that you have developed on a test server.
Note: If your domain is not pointing to your FASTDOT account, you can use your ‘temporary URL’. Your temporary URL can be found in the email titled ‘New cPanel Hosting Account Information’ which was sent to you upon signup.
Click on ‘Save Changes’ to complete transferring your wordpress site
Login to your WordPress Site
Login at /wp-admin
Select Settings > General on the menu on the left
Have your nameservers been delegated to FASTDOT?
Enter http://yourdomain.com into the WordPress Address (URL) and Site Address (URL) fields
This is the end of the tutorial of how transferring your WordPress site to FASTDOT.
FAQ
I can’t upload images, why?
“Unable to create directory. Is its parent directory writable by the server?”
Check permissions are 755 on ‘wp-uploads’ folder
I can’t see my site at ‘fastdotaddress.com’ what’s happening?
Check to see what directory WordPress is in under ‘public_html’
Make sure step 6 has been followed correctly with the correct address
Make sure your nameservers have been delegated, if not, use the temporary address transferring your WordPress site to FASTDOT.
How to use Your Temporary URL with WordPress
When transferring your WordPress installation to FASTDOT you may need to use the temporary URL, this URL will allow you to access your site before the Name Servers have propagated to ours.
A few of the symptoms or issues you may be running into are:
My Domain name isn’t resolving to my new account yet.
I don’t get any images or themes to show up, just the text.
I can’t log into my Administrator Panel, because logging in wants to take me to a url with my domain.
How can I change my settings to allow me to view my WordPress Blog before my domain name resolves?
Changing to the temp URL
There are a few cases where you might need to go in and change a URL in the WordPress database.
My domain name isn’t resolving to my new account yet, so I have to visit my WordPress install with a URL like http://111.222.333.444/~example/. I don’t get any images or themes to show up, just the text.
I also can’t log into my Administrator Panel, because logging in wants to take me to a URL with my domain name in it. How can I change my settings to allow me to view my WordPress blog before my domain name resolves?
The URL appears like http://www.domain.com/addondomain/ and there are no redirects in the .htaccess
If WordPress was installed to an addon domain, then the database URL will need to be changed to something like http://www.addondomain.com
This requires a little MySQL trick. It’s two simple edits in the database.
First, make sure that your WordPress installation is complete, and you know what the name of the database is. If Installatron or Fantastico installed WordPress for you, it’s likely the name of the database is something like:
username_wrd1
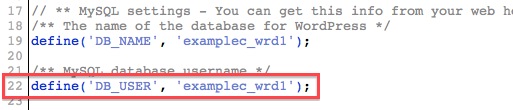
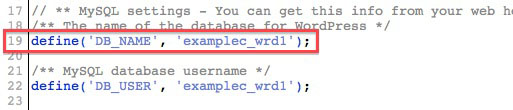
If you don’t know the database name, you can use the File Manager to look inside the wp-config.php file to find out its name.
Right click wp-config.php and select Code Edit. You can now see the username and database.
Next, log into your cPanel. Look for the Databases section.
Select the icon named phpMyAdmin (looks like a sailboat.)
Once here, you need to select the database name on the left. (i.e. “_wrd1”)
This will display the names of the Tables to the right.
Now there are icons to the right of the tables. The First one is called “Browse”. Click “Browse”.
Next, the database entries are listed in columns and rows. You want to select the pencil icon (for Edit) on the left for the top row (option_name is “site url”)
Once you’ve clicked the pencil icon, you will see your domain name listed something like this:
http://example.com/
You want to change that to something like this:
http://221.121.145.213/~massivenew/
This step is crucial so you don’t make a mistake. Please take a moment to verify the URL you are typing in here is correct, or you won’t see any change.
Once you’ve changed the URL, down at the bottom there is a “Go” button. Select the “Go” button.
Select the next button to go to the next page
Look for the option_name home
Select the pencil icon to Edit.
Make the same URL change here as you did for siteurl earlier. And click the “Go” button.
Visit your Temporary URL (https://111.222.333.444/~examplec/) for your blog, and all the images will show up just fine.
Changing from the temp URL
Once you’ve changed your name servers so your domain name resolves to your account, you don’t have to go back into phpMyAdmin to make the change again.
Log into your WordPress Admin Panel
Click the tab “Settings”. Here you will see WordPress and Site address (URL):
It is set to your Temporary URL .
Change this to your domain name with any folders required, and you’re back to normal.