How to Deploy a WordPress® Staging Site With cPanel
Deploying a WordPress staging site allows you to test changes, updates, and new features in a safe environment without affecting your live website. With cPanel, this process is straightforward. Here’s a step-by-step guide to deploy a WordPress staging site using cPanel:
1. Log into cPanel: Begin by logging into your cPanel account. This is typically accessed via https://yourdomain.com:2083 or http://yourdomain.com/cpanel.
2. Backup Your Live Site: Before making any changes or creating a staging environment, it’s essential to backup your live WordPress site.
- Go to Files > Backup in cPanel.
- Choose “Download a Full Account Backup”.
- Store the backup safely. This allows you to restore your live site in case anything goes wrong.
3. Create a Subdomain for Your Staging Site:
- Navigate to Domains > Subdomains.
- Enter a name for your subdomain (e.g., “staging” to create “staging.yourdomain.com”).
- Click “Create”.
4. Copy Your Live Site to Your Staging Subdomain:
- In cPanel, navigate to Files > File Manager.
- Locate the root directory of your live site (commonly
public_html) and the root directory of your newly created subdomain. - Copy all files and folders from the live site directory and paste them into the staging site directory.
5. Clone the WordPress Database:
- Go to Databases > phpMyAdmin in cPanel.
- Select your live WordPress site’s database.
- Click the “Export” tab and choose the “Quick” export method. Then, click “Go” to download a copy of the database.
- Go back to the cPanel main screen and navigate to Databases > MySQL Databases.
- Create a new database for the staging site.
- Create a new user for this database and assign it all privileges.
- Navigate back to phpMyAdmin, select the new database, click the “Import” tab, and upload the previously exported database file.
6. Update the WordPress Configuration for Staging:
- In the File Manager, navigate to the staging site directory.
- Edit the
wp-config.phpfile.- Update the
DB_NAMEto the name of the new database. - Update the
DB_USERto the new database user. - Update the
DB_PASSWORDto the new user’s password.
- Update the
7. Update URLs in the Staging Database: Since you’re moving from the main domain to a subdomain, you’ll need to update the URLs.
- In phpMyAdmin, select the staging site’s database.
- Run SQL queries to replace the live site URL with the staging site URL.
UPDATE wp_options SET option_value = replace(option_value, 'http://yourdomain.com', 'http://staging.yourdomain.com') WHERE option_name = 'home' OR option_name = 'siteurl';

UPDATE wp_posts SET guid = REPLACE (guid, 'http://yourdomain.com', 'http://staging.yourdomain.com');

UPDATE wp_posts SET post_content = REPLACE (post_content, 'http://yourdomain.com', 'http://staging.yourdomain.com');

UPDATE wp_postmeta SET meta_value = REPLACE (meta_value, 'http://yourdomain.com','http://staging.yourdomain.com');
8. Test the Staging Site: Visit http://staging.yourdomain.com to ensure everything is working correctly.
9. Password Protect the Staging Site (Optional): To prevent search engines from indexing your staging site and visitors from accessing it:
- In cPanel, go to Directory Privacy under Files.
- Navigate to the staging site directory and set up password protection.
10. Perform Tests and Make Changes: With the staging site ready, you can now make changes, update plugins, and test new features without affecting the live site.
11. Push Changes to the Live Site: After testing, you can manually replicate the changes on your live site or use plugins to migrate changes.
Setting up a WordPress staging site in cPanel offers a safe environment for testing. Always ensure backups are taken regularly, and restrict access to the staging site to keep it secure.
Editing a production WordPress site is like detailing your car while it’s driving down the freeway. You might arrive at your destination on time and looking good. Then again, it could all go horribly wrong—and if you do it often enough, your luck will run out eventually.
If a business depends on its WordPress site or WooCommerce store, editing the live production installation is simply not worth the risk. WordPress staging sites, also called development sites or testing sites, are the safe alternative.
In this article, we explain what you need to know about WordPress staging sites, why you should use them, and how cPanel’s WP Toolkit (WPT) makes it easy to deploy a staging site and synchronize changes back to the production site.
What Is a WordPress Staging Site?
A staging site is a cloned copy of a production site. It has the same data and files, but it isn’t accessible to the public, and it’s usually hosted on a different subdomain. Any changes you make to a staging site are not transferred to the production site unless you want them to be. Because it’s a clone hosted in the same environment, it behaves just like the production site, making it the ideal testing ground.
In the past, creating a staging or development site was complicated and time-consuming. You had to export data from the production database, create a new database, import the data, copy the files, reconfigure the site, and set up a staging subdomain. Then you’d have to reverse the process to deploy the changes to production.
That complexity is why many WordPress users don’t use staging sites, instead opting for the risky high-wire act of editing a busy live site. However, if you host WordPress sites on a server managed by cPanel & WHM, the whole process takes just a few clicks.
Why Do You Need a Staging Site?
There are many situations where it’s a good idea to deploy a WordPress staging site to test changes before committing to them. Ideally, any change more complicated than publishing a post gets thoroughly tested before it goes live.
Use cases for staging sites include:
- Testing new landing pages to ensure every component works as expected before potential customers visit.
- Testing updates for compatibility issues, although WP Toolkit can automate that for you with Smart Update.
- Creating a new theme or editing your current theme.
- Editing the site’s code to add new functionality.
Staging sites are also useful when you want to let developers and designers work on your site but don’t want to give them access to the production installation.
How to Setup a WordPress Staging Site
We’re going to walk you through the process of creating a staging site and deploying changes back to production. We’ll be using the clone and staging features in WordPress Toolkit Deluxe.
Select WordPress Toolkit from cPanel’s main page menu and expand the detailed view of the site you want to work with.
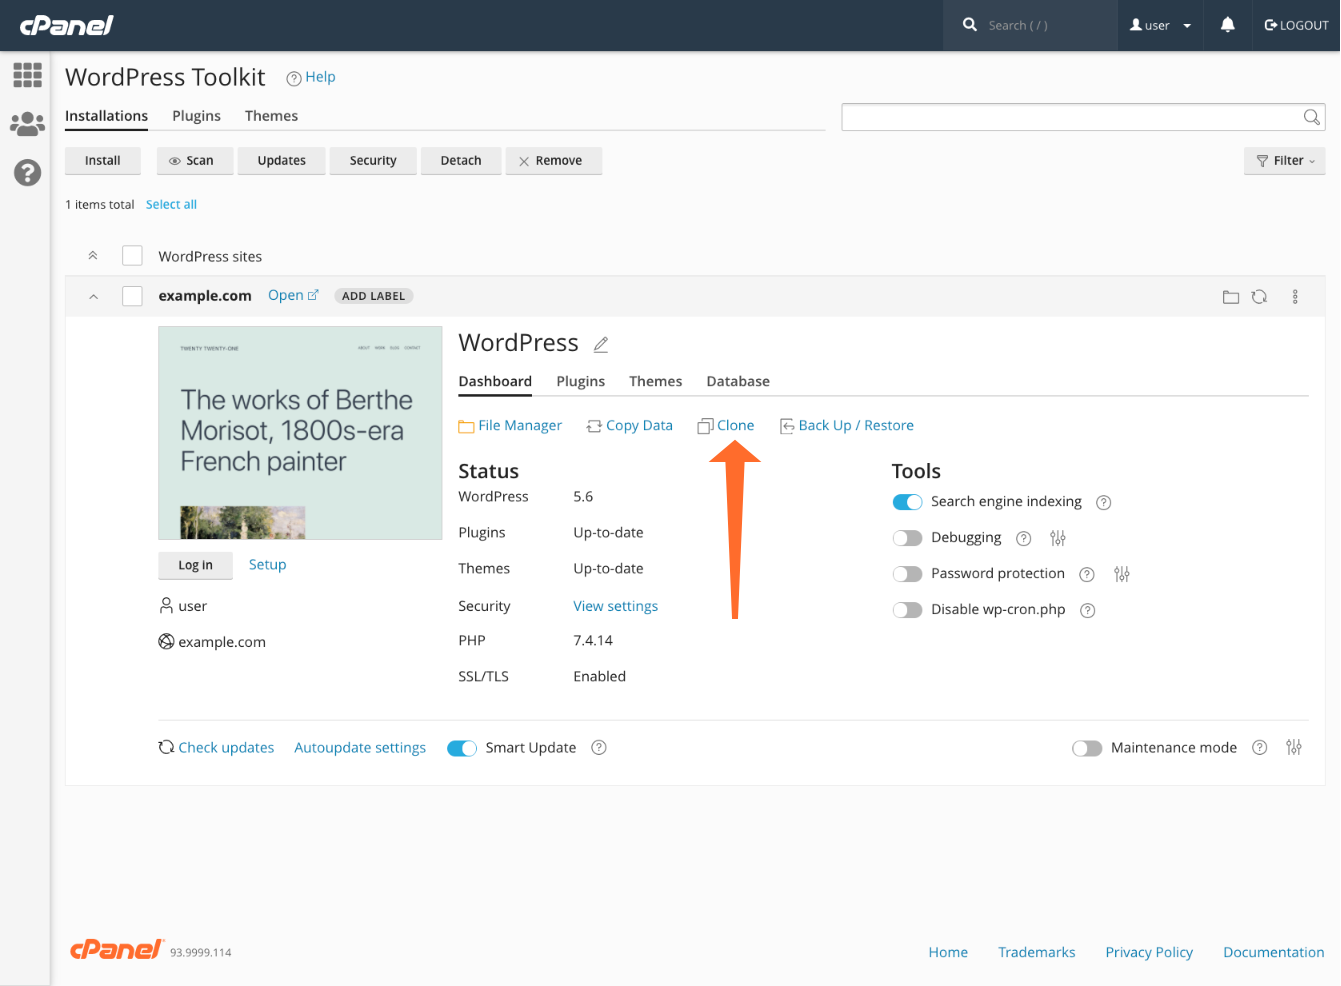
Click the Clone tool in the dashboard view. In the Clone interface, you can choose the staging site’s subdomain and path. The subdomain can be a pre-existing domain, or the Toolkit can create a new one. If necessary, you can also change the database name.
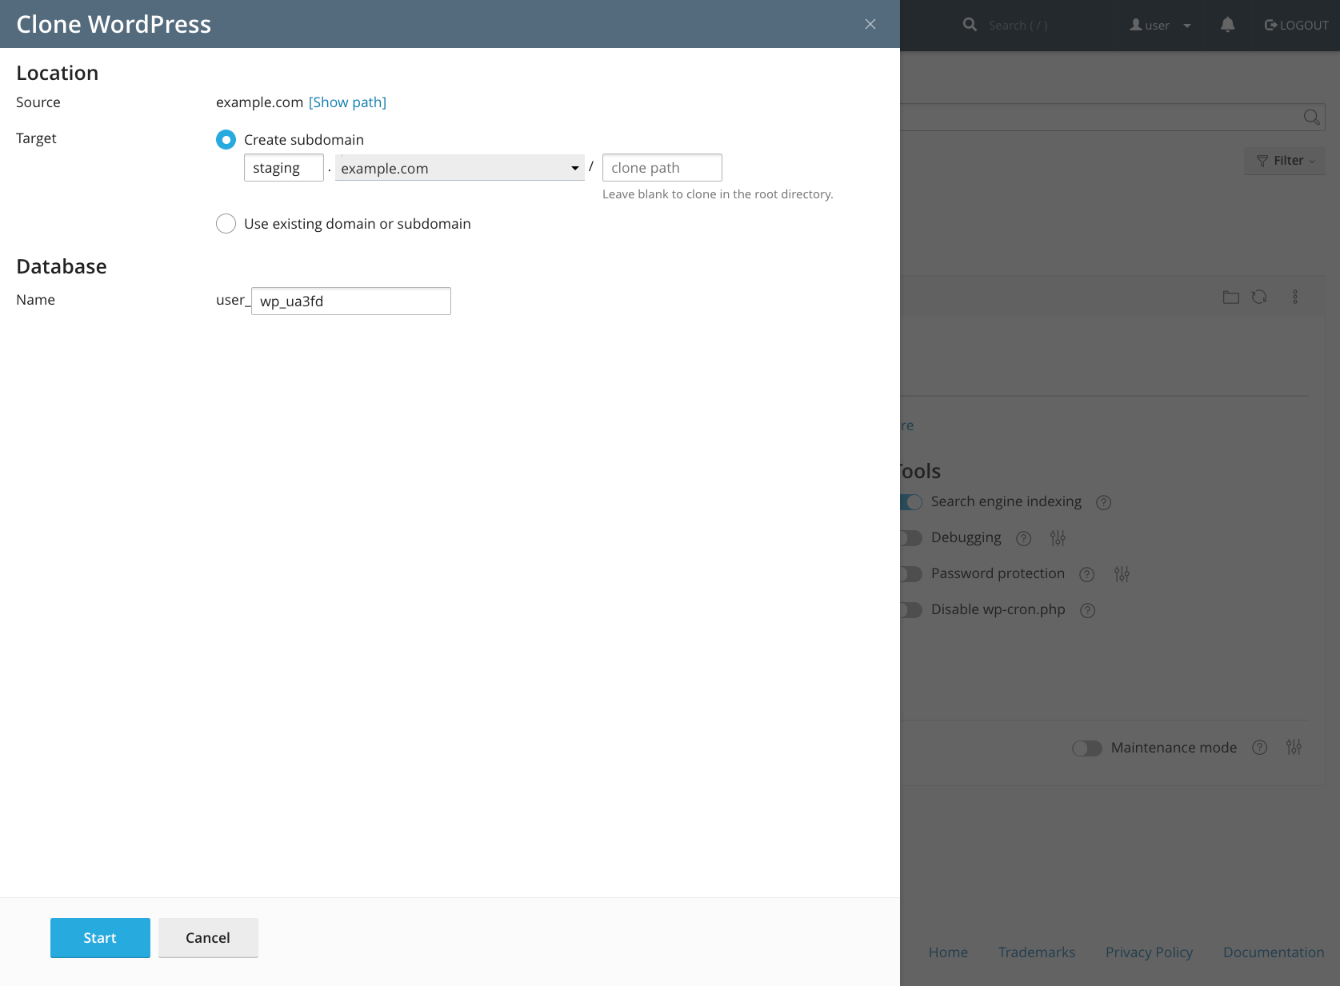
That’s it! The Toolkit will now create the staging site and subdomain. You can access the new site in the main WPT interface alongside your other sites.
To make staging sites easier to tell apart from live sites, use WPT’s labels. Click Add Label and choose an appropriate option from the dropdown menu.
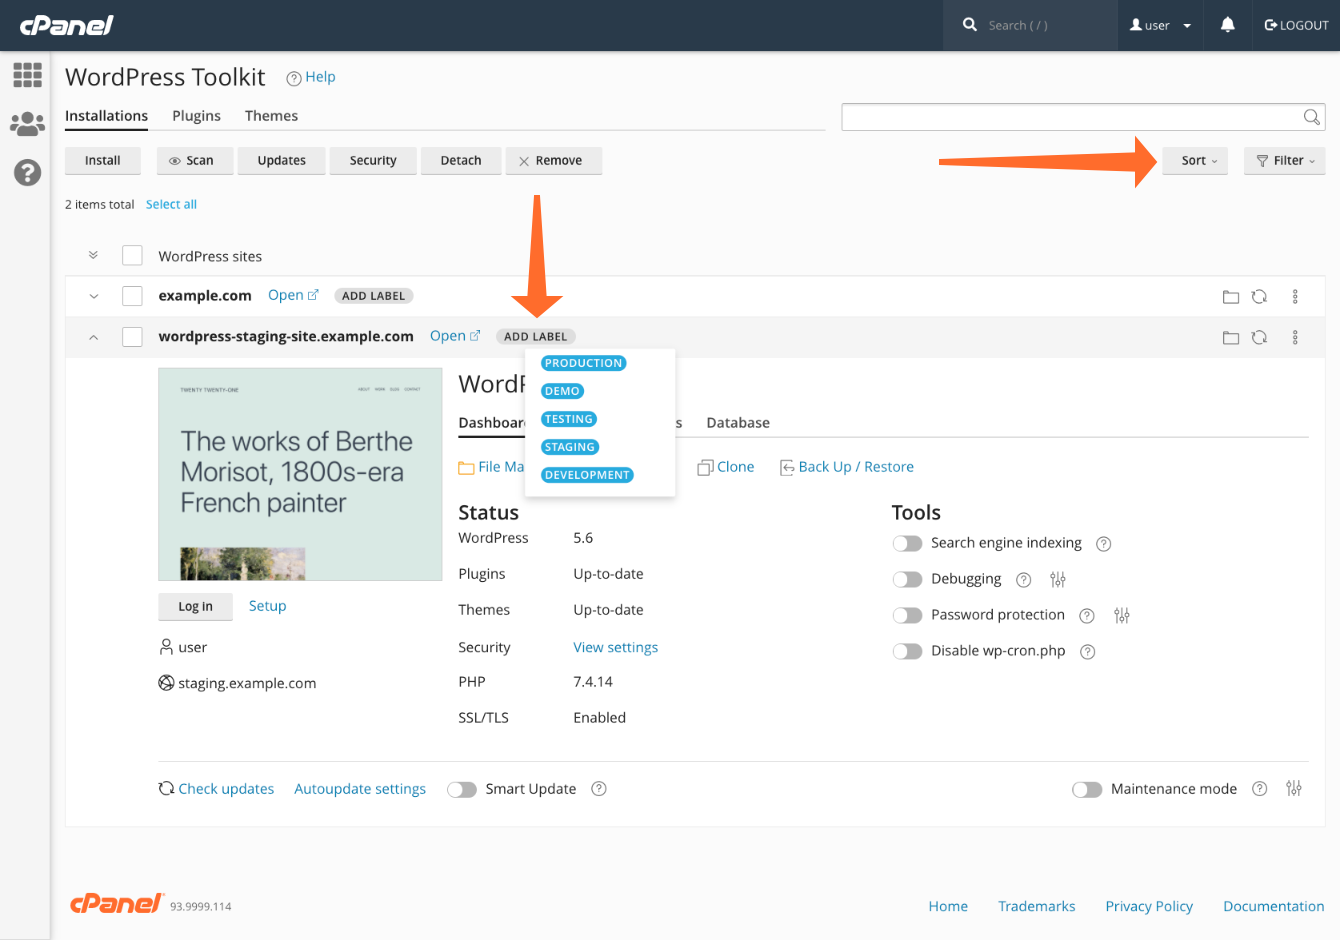
After sites are labeled, you can sort and filter them using the Sort and Filter dropdowns at the top right of the interface.
Commit Staging Site Changes to Production
Once you have developed and tested a new feature or design, it’s time to push the changes to the production site. To do that, we have to copy the staging site’s database and files. This would once have been a complicated and error-prone process, but it can be done safely in less than a minute with WP Toolkit.
Click the Copy Data tool in the staging site’s WPT dashboard.
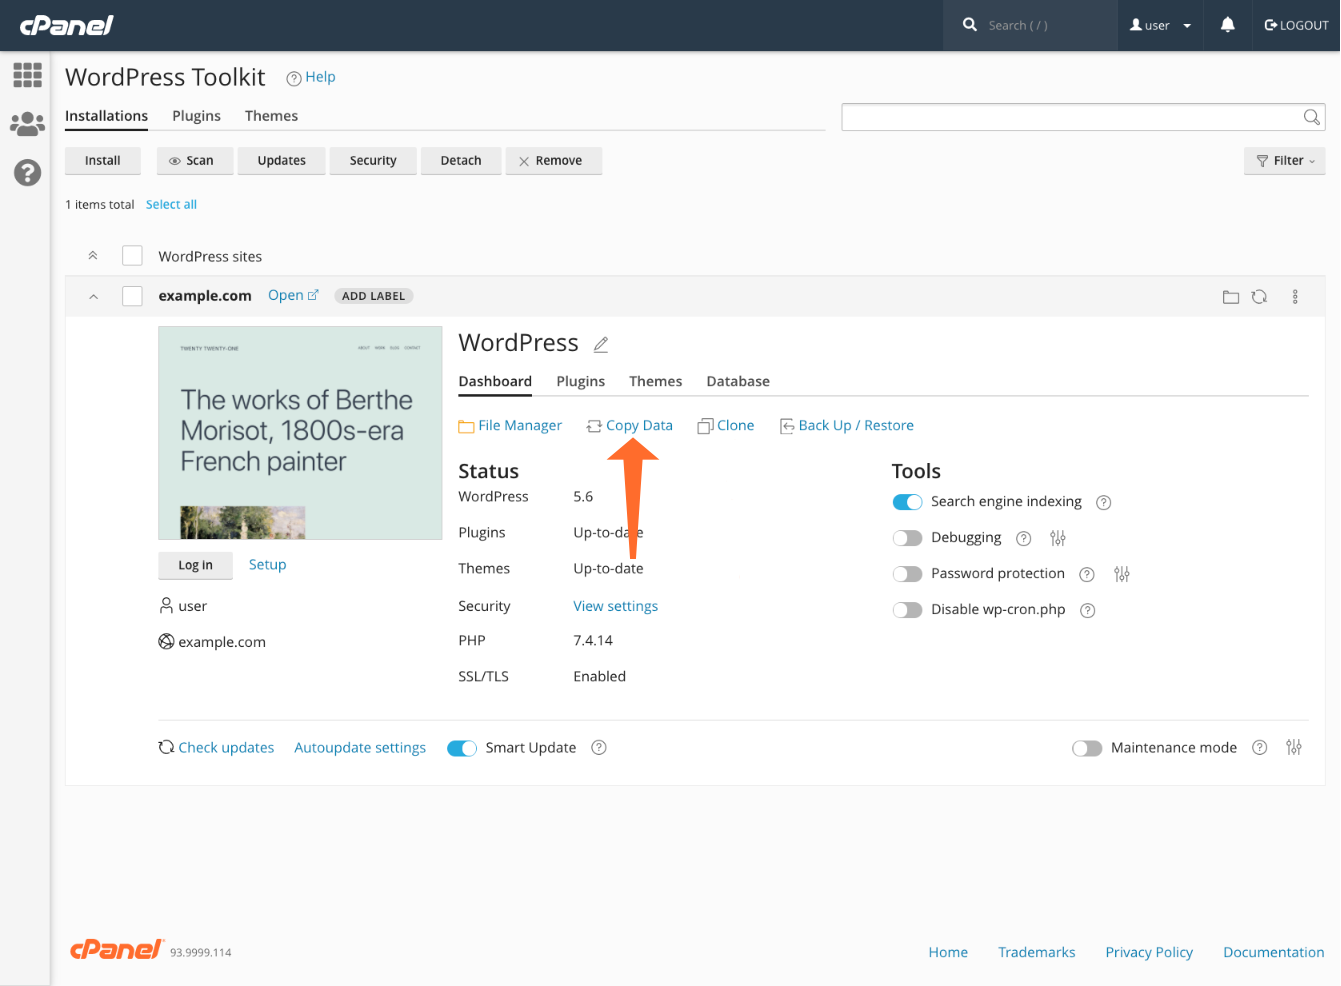
In the Copy Data interface, select the production site from the Target dropdown menu. You have fine-grained control over which aspects of the site are transferred. You can copy the files, database, and specific database tables. You can also choose whether to overwrite and delete production files if they were edited or removed on the staging site.
In our example image, we’re copying everything except the database’s post and user tables and their associated metadata tables. That allows us to synchronize the WordPress instances without overwriting or deleting posts and users created after we made the staging site.
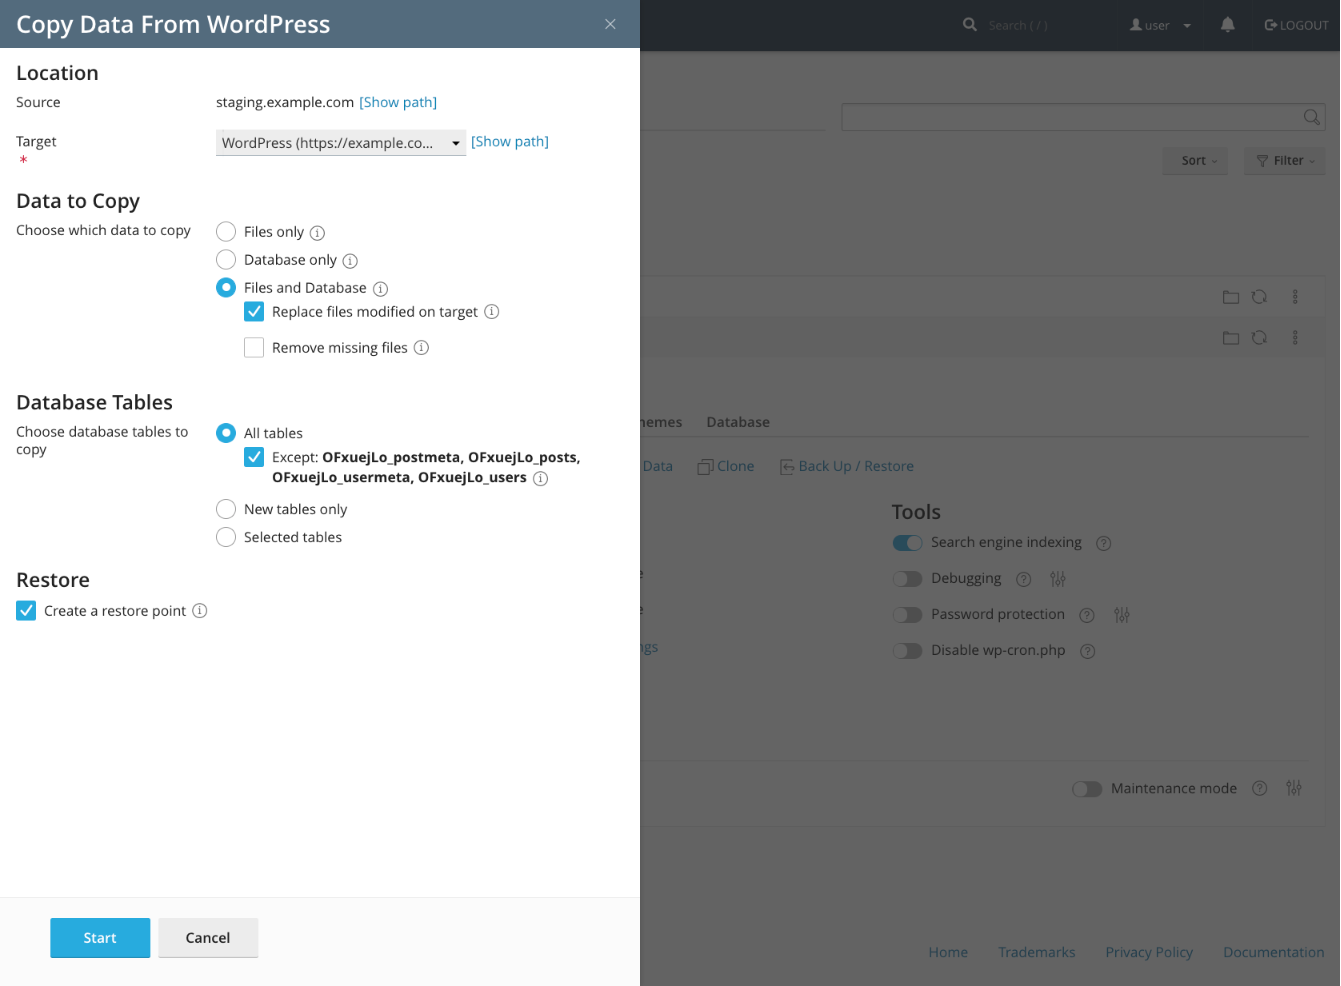
Because copying can be a destructive operation, WPT automatically creates a restore point so you can quickly roll back if something goes wrong.
Together, WordPress Toolkit’s clone and copy features provide quick and simple-to-use staging site deployment. You can create a staging site in seconds and push changes to production just as easily. For agencies and other businesses that offer WordPress hosting and management services, the WPT means faster, safer, and more reliable WordPress workflows.


